Before you start
- A photo of each product. Square photos look best.
- Your prices in dollars. Enter them before tax; tax is added at pickup.
- How many days' notice each product needs.
Step by step
-
Open Menu Management
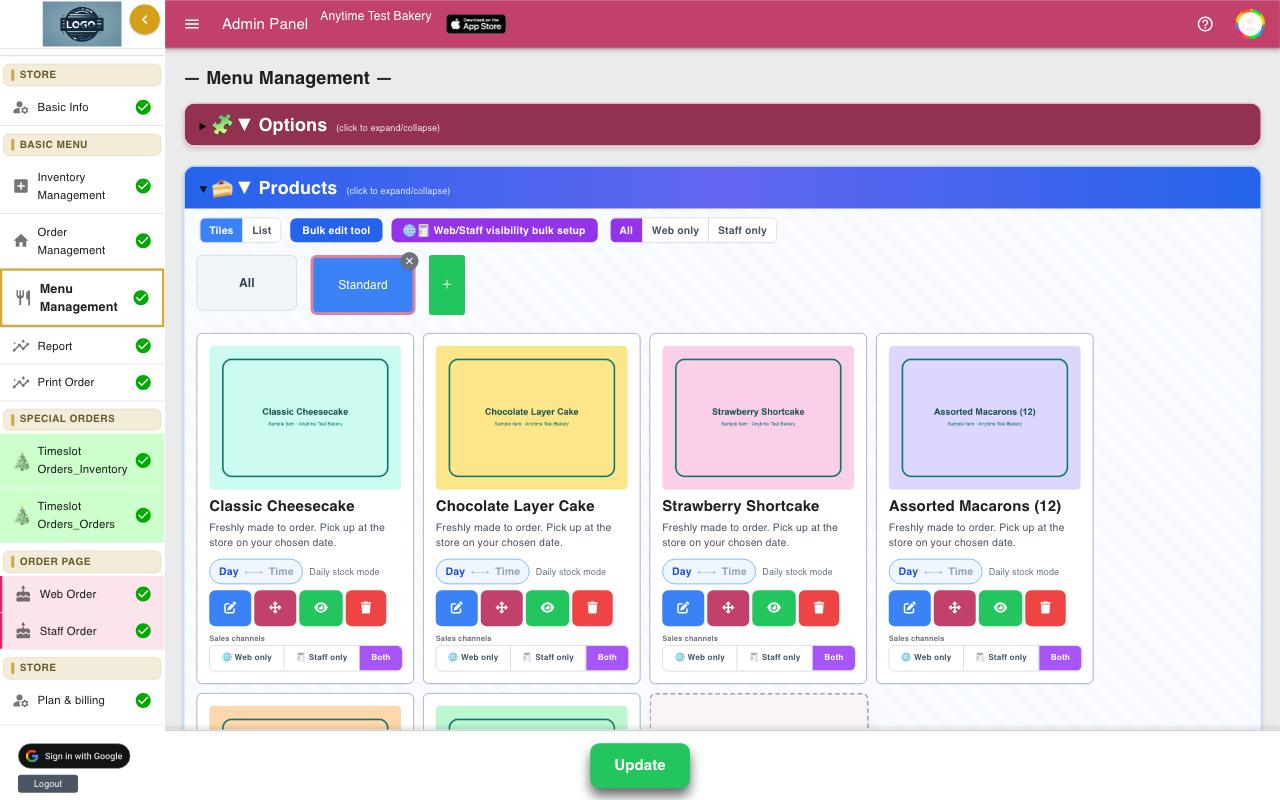
Click Menu Management in the left menu. The page has two sections you can open and close: Options at the top and Products below it.
Important: nothing on this page is saved until you click the green Update button at the bottom. You will see Menu updated. when it worked.
-
Create your categories
Products are grouped into tabs, such as Cakes, Bread or Seasonal. Click the green + next to the tabs and type a name. Customers see the same tabs, in the same order, on your order page.
Drag tabs to change their order. To rename a tab, click it once to select it, click it again, type the new name, then click somewhere else.
-
Add a product
Select a tab and click the dashed + card at the end. A new product appears right away with a starting price of $6.00. Click its pencil button to open the product window.
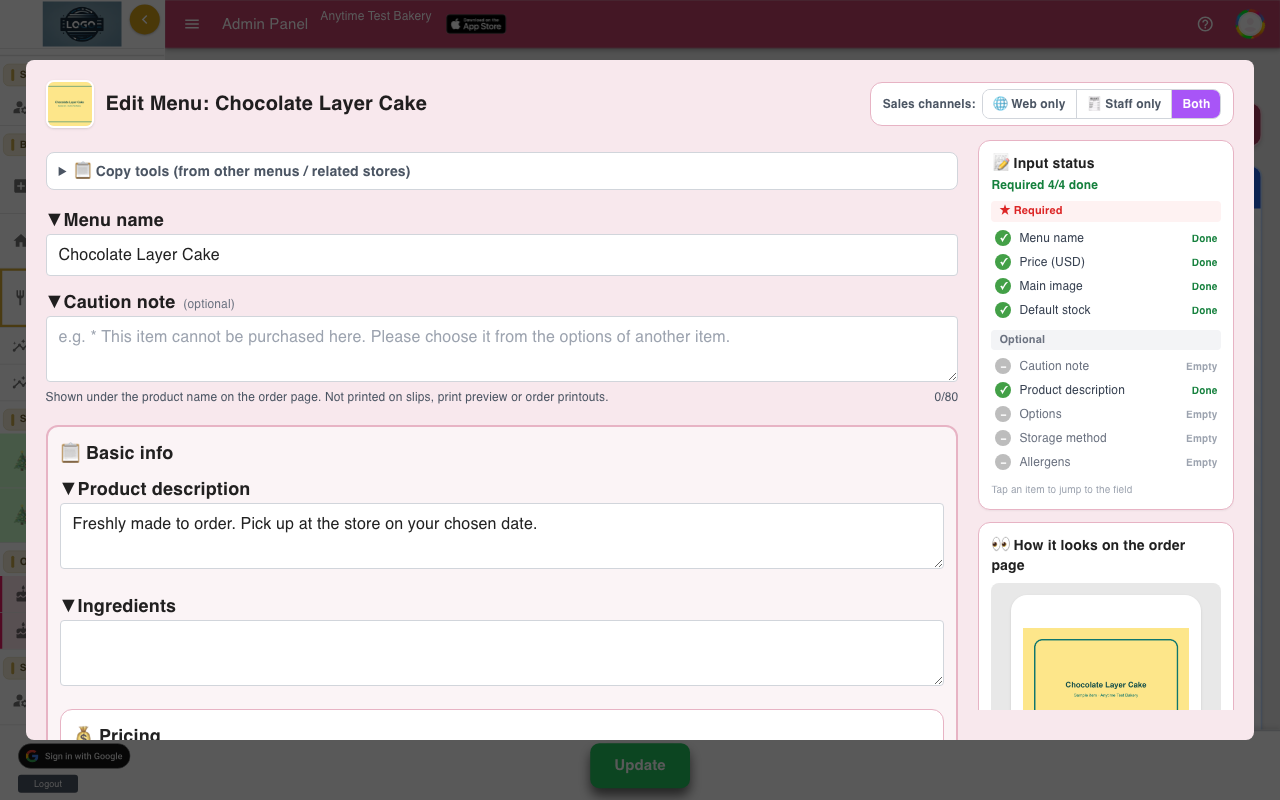
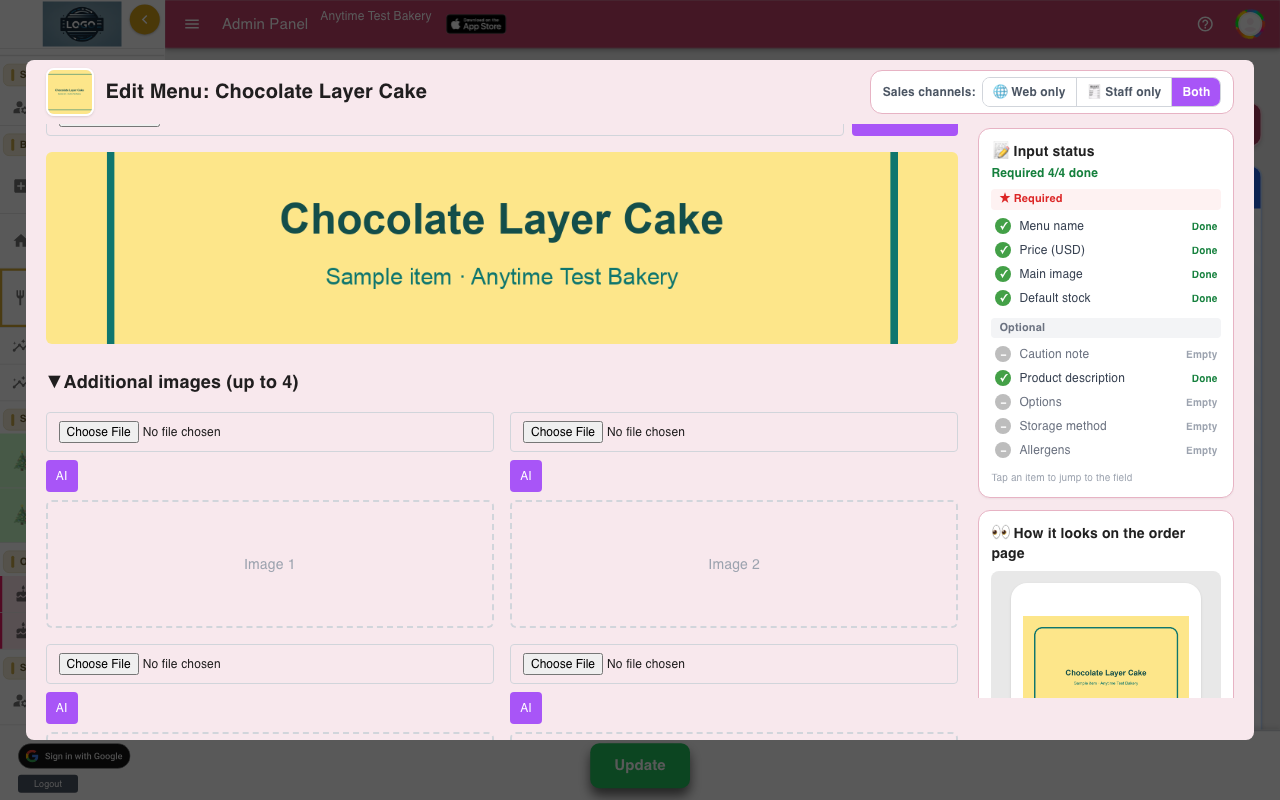
The Input status panel on the right shows which fields are still empty. Below it, How it looks on the order page shows a live preview.
-
Name and describe it
Enter the Menu name. Each product needs a different name; two products with the same name stop Update from saving.
Add a Product description and Ingredients if you like; customers see them on the product page. Use Caution note (optional) for a short line under the name, such as "Contains nuts", up to 80 characters. Caution notes are not printed on slips.
-
Set the price and a sale price
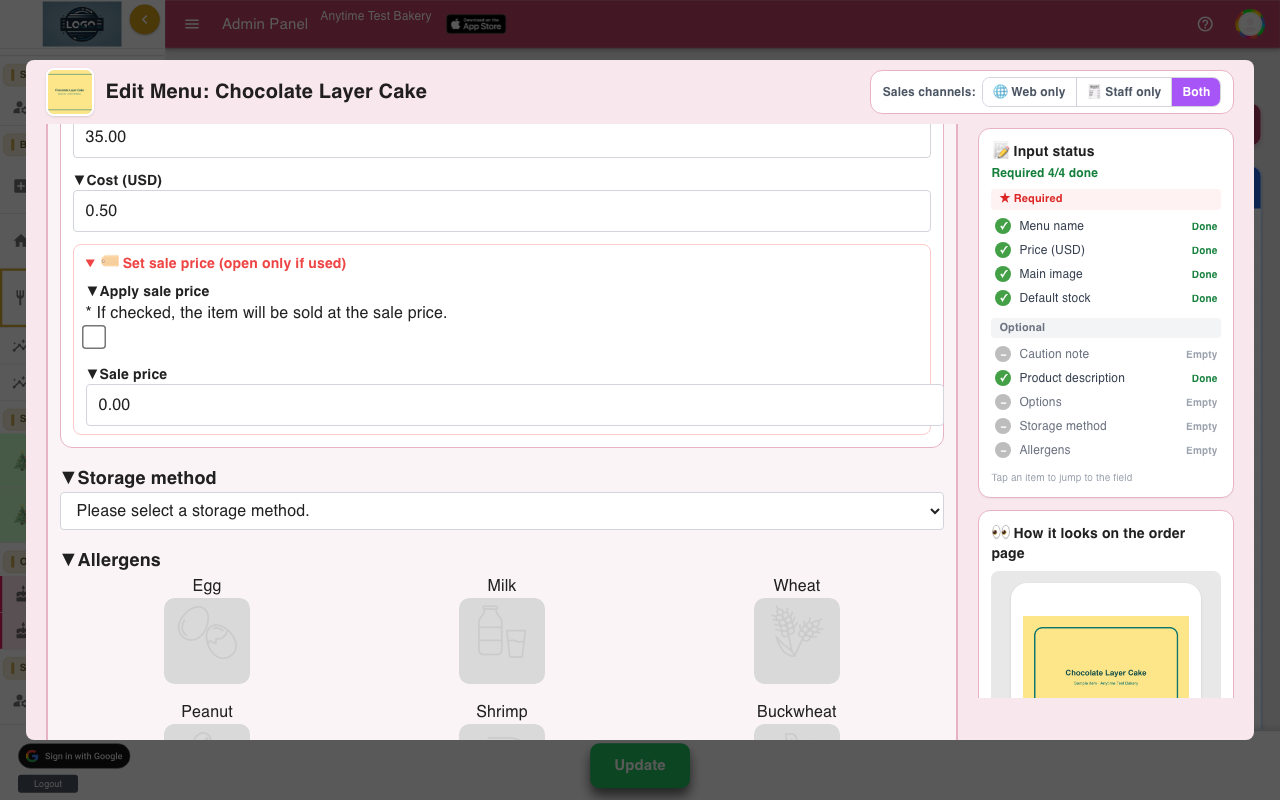
In Pricing, type the Price (USD) in dollars with no dollar sign. For example, type 28 or 28.00 for $28.00 and 4.50 for $4.50. Cost (USD) is only for your sales reports.
To put a product on sale, open Set sale price, tick Apply sale price and enter the Sale price. Customers see the old price crossed out next to the sale price.
-
Set how much notice it needs
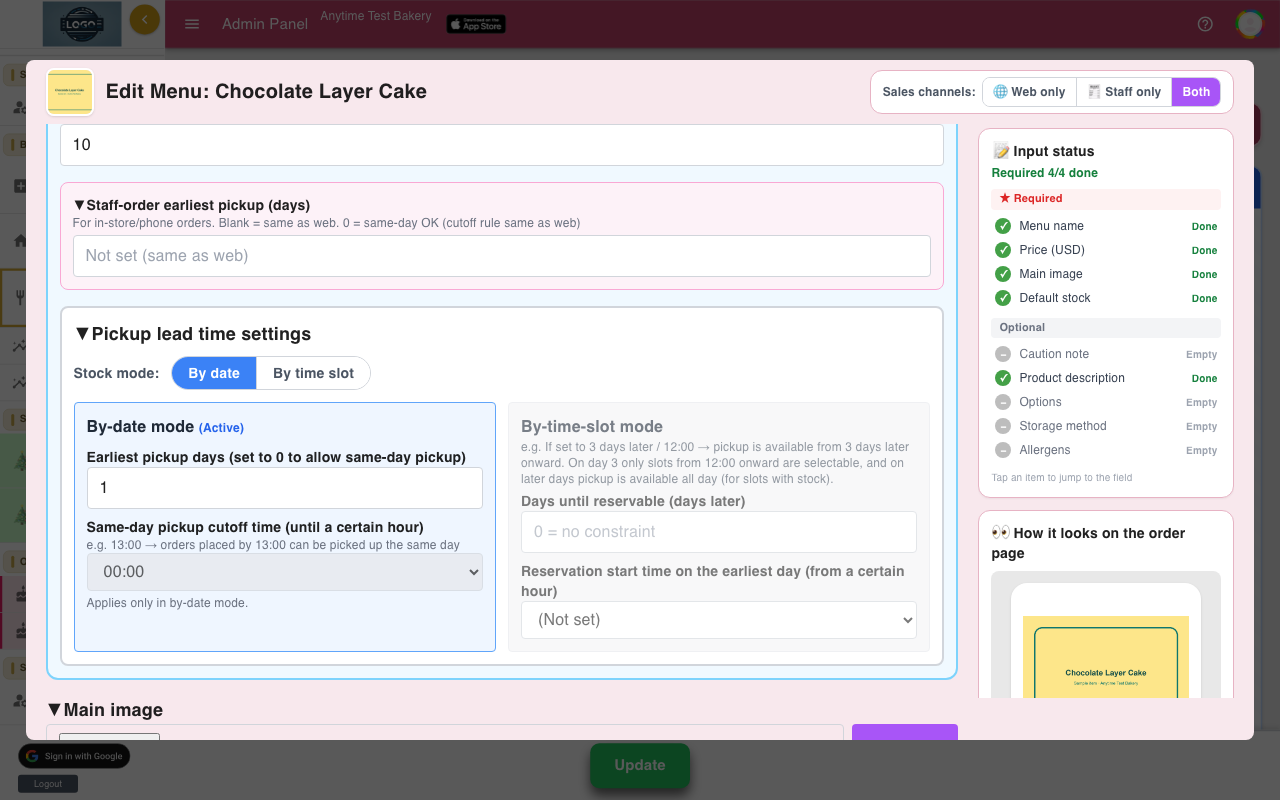
In Stock & pickup settings, enter Default stock, the number you can make each day (see Inventory and stock). Under Pickup lead time settings, keep Stock mode on By date for most products.
Set Earliest pickup days: 1 means tomorrow at the earliest, 2 means the day after. Enter 0 to allow same-day pickup, and then choose a Same-day pickup cutoff time, for example 11:00. Customers see a badge such as Pickup from 2 days later.
-
Add photos
Under Main image, choose a photo. It uploads straight away. Under Additional images (up to 4), add up to four more; customers can swipe through all five.
Remove an extra photo with the red × on its slot.
-
Choose where it is sold
At the top right of the product window, Sales channels decides where the product appears: Web only (your order page), Staff only (the Staff Order screen), or Both.
Further down you can turn on Allow message plate selection and Allow image upload at order time. See Options and message plates.
-
Save the product, then click Update
Click Save at the bottom of the product window. This closes the window but only keeps your changes on this page.
Click the green Update at the bottom of Menu Management to save them to your shop. Your order page changes straight away.
-
Hide, move, reorder or delete
Each product card has four buttons: pencil (edit), arrows (move to another tab, or left and right), eye (switch between Published and Hidden), and bin (delete). You can also drag cards to change their order within a tab.
Hidden products disappear from your order page but keep their settings. Click Update after any of these changes.
-
Edit many products at once
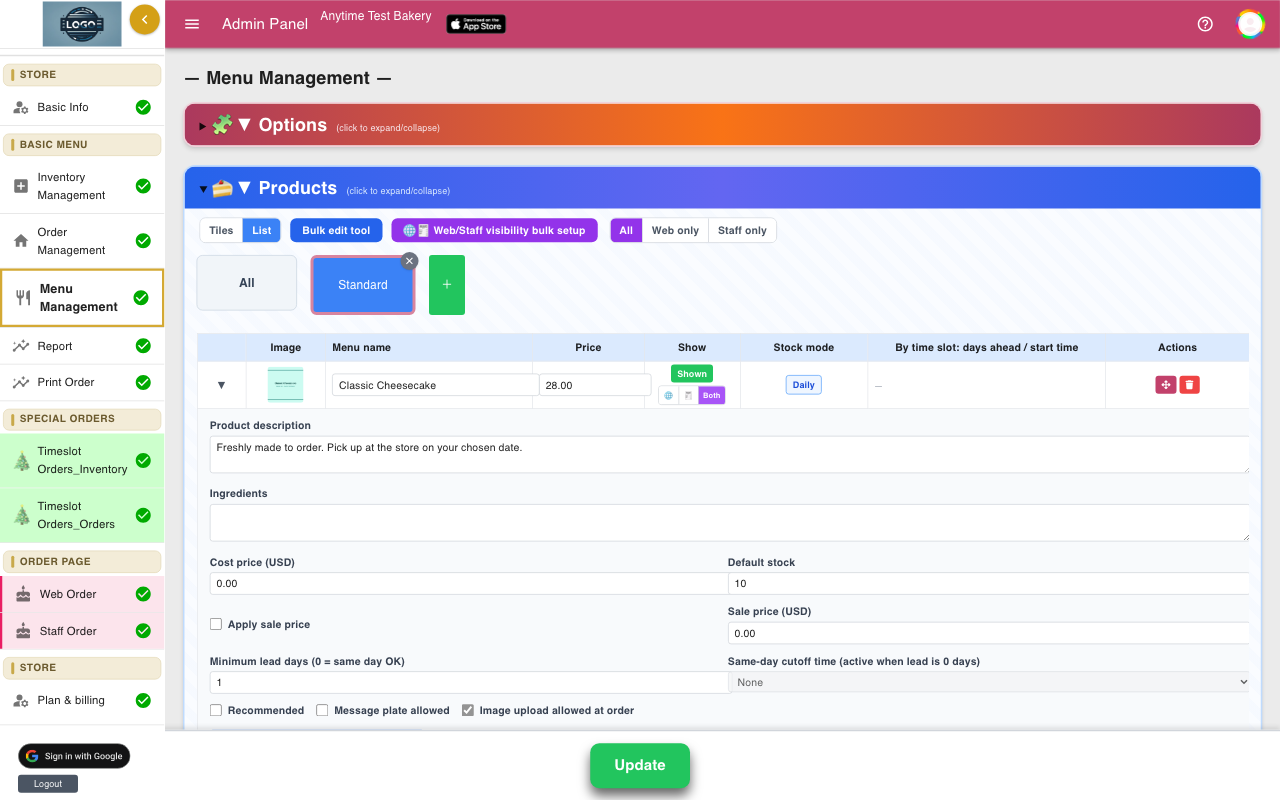
Click List at the top to see every product as a row you can edit in place: price, sale price, Default stock, Minimum lead days (0 = same day OK) and more.
Bulk edit tool changes a setting for every product in every tab, for example showing or hiding all of them or setting the same lead time. Click Apply, then Update.
Tips
- When you allow same-day pickup (0 days), always choose a Same-day pickup cutoff time. Without one, same-day pickup is never offered.
- Copy tools in the product window can copy another product, including its name. Change the name before you click Update, or the save will be refused.
- Deleting a tab deletes every product in it. Move the products you want to keep first.
- Hide seasonal products instead of deleting them. Next year you only need to switch the eye back on.
Questions
My changes disappeared. What happened?
Most likely the page was closed before clicking Update. Saving the product window only keeps the change on this page; Update saves everything to your shop.
Should prices include sales tax?
No. Enter prices before tax. The order page tells customers Tax is calculated at pickup, so you add tax when they pay.
A customer ordered a product with a short lead time and a long one. Which wins?
The longest one. The earliest pickup date follows the product that needs the most notice.
What is the Recommended box in List view?
Products ticked as Recommended appear under Recommendations in the customer's cart. New products are ticked by default.
I get "Menu names are duplicated" when I click Update.
Two products have the same name, maybe in different tabs. Rename one, for example "Carrot Cake 6 inch" and "Carrot Cake 8 inch", and click Update again.
Related guides
Still stuck? Email us at support-global@cakesystem.net.